Fashion
Handy Steps of Threading Pearl Jewelry Easier And Quicker
So, are you considering doing pearl stringing for a hobby or even as a professional? It is a procedure that demands patience and a lot of practice. You need to consider some variables before you jump into the pool, especially if you want to make it a career. Otherwise, anyone can do some easy knitting without requiring experience or knowledge.
Before we get to the steps of pearl stringing, we need to get the right materials first. That’s a pivotal point to consider. The thread used can either be silk or nylon. What you need:
Pure Silk thread: Use size C, D, and E, or natural silk thread size 10 or 12. Both are good to work with, but purely silk is more durable and can withstand pearls’ grazing without losing its soft sheen.
Miyuki Dura-line beading thread is a pre-waxed thread and the most vital beading thread in white made from 100 percent polythene. It quickly makes the knots and makes strong fiber cords without stretching.
Let’s get to the quicker way of pearl stringing and knotting.
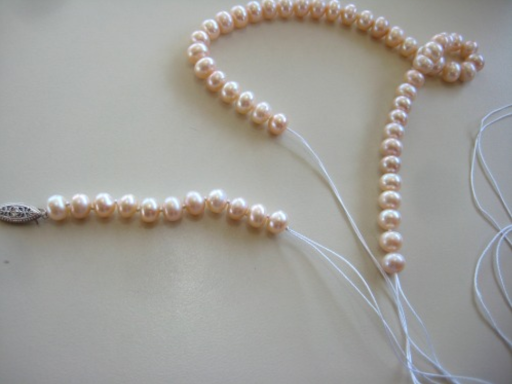
The whole idea of knotting is to prevent the beads from rubbing each other. You can use matching thread with your pearls or make a contrast; it’s up to you. The materials you need include Silk thread, tweezers or pin, clam shell, and pearls. Note that the string needs to be longer than your necklace’s actual size because of the many knots you will be tying.

It is crucial to make a knot at the end of the cord as you start, or you can also use a clam shell to hold and cover the knot. Although it’s not mandatory to use two strands of thread, it helps make the necklace sturdier. Ready to start your pearl stringing?
Step 1: Take your first bead and pass the thread through it.

Step 2: Hold the bead using your thumb and the other side with your ring finger to allow the pointer and middle finger to loop the knot. Then you can start wrapping the thread around your two fingers, the pointer finger and the middle one. That should create an overhand knot.

Step 3: Now, start wrapping the thread around your fingers twice as you stop in the back.

Step 4: Move the thread over the other thread wrapped around the top of your fingers. Bring it under using back to the front method.
Step 5: Pull the threads through, and using the tweezers, let it pass under the line that is closer to the end of your finger. Get the thread closer and put it to the threaded pearl.

Step 6: Without releasing the tweezers, slowly take off your fingers from the loop.

Step 7: Now start making those knots by pulling on the thread as you slide the beads gently, one by one.
Step 8: Carefully grab the knot’s loop using your tweezers, bringing them closer to the pearl.

Step 9:
- With the help of your tweezers, start tightening the knots as you push them closer to the pearl.
- Repeat this process until you finish an entire strand, which should be your desired length. You can add a clasp, French wire, or a clam shell to the end of the necklace.
- If you choose a clam shell, ensure to put some glue inside.
Step 10: Now that you are through with your pearl stringing, trim the threads. If you used the clam shell, wait for it to dry.

Add clasp and Voila! You are now the satisfied proprietor of a magnificent handmade pearl necklace. Eventually, you become better as you keep practicing.
In conclusion, you see how super-easy was that? I believe after following the few steps shown here, anyone can start pearl stringing and get a lovely piece of jewelry. You can now use this handy craft to make something unique for your loved ones. Anything handmade has a higher value than a present bought.


Piet Mondrian x Doodles: Five of Modern Art’s Most Iconic Masterworks Reimagined as Digital Collectibles and Physical Art Prints — For the First Time Ever

CRYMADX Is Trying to Fix What’s Broken in Crypto — And It Might Actually Work

Legal Lines in a Shadowed Space: When People Falsify Death to Dodge Prosecution

Can Padded Envelopes Cut Damage Rates Without Slowing Same-Day Fulfillment?
Kotiuta.com Sets a New Standard for Casino Comparison Transparency in Finland

Scandcoin (SCA) Launches Pioneering Platform, Backing Crypto Assets with Real Scandinavian Startup Equity

The Purr-fect Wave: How TabbyCatMeme ($TCAT) is Redefining the Meme Coin Game on Solana

Lithosphere Advances Agent-Centric Blockchain Infrastructure Through Expanding Web4 Ecosystem

Focusing On Localized Regulatory Adaptation, Truoux Embraces The MAS Regulatory Framework

The Resale Math Behind Choosing Herman Miller Furniture Over Fast Furniture

Arxia, The Next Major Layer 1, Records First Blockchain Transaction Over LoRa Radio Without Internet, Cellular, or Satellite

Employer is Targeted in €96,000 Death Benefit Scam

Extradition to Utah Ends Years of Identity Denials

The Final Flight: Witnessing the End of an Era for Orbán’s Billionaires

The Cook Islands and Beyond: Why Certain Jurisdictions Dominate the Global Trust Market